I am using a very bulky yarn and large needles size 13, which makes this tutorial really easy to follow, but YOU can use any size needles and yarn that you prefer.
TUTORIAL- I- CORD BINDOFF
STEP 1: With your regular needles prepare a swatch. You can use any size needles and yarn that you wish. Make sure you have two DP needles to match your pocket or swatch needle.
I would cast on 15 to 20 stitches and then work an equal number of rows. You are now ready to begin this tutorial

STEP 2: Cast on three additional stitches for the I-Cord Bind off. Note: you may cast on any amount of stitches you desire, the more stitches the larger/ thicker the I-Cord will be.
Insert right needle, through last two stitches on left needle.........wrap yarn around right needle and....

STEP 3: Pull up stitch (loop) with right needle as shown in the photo below.

STEP 4: Twist the stitch (loop) you just pulled through and transfer it from your right needle to the left needle. One cast on stitch made.

STEP 5: Insert your right needle Front to Back between stitch just made and last stitch on left needle. Pull the loop up through the original two stitches.
Twist right needle clockwise and place new stitch on left needle. It will look like the photograph in step 6 below, after you have cast on the 3 required stitches. Note: your I-cord can be as big as you choose, add as many stitches as you require.

STEP 6: Repeat this procedure until there are three new stitches on the left needle...as shown in the photo to the below.

STEP 7: Pick up and put these last three stitches and put them on your DP needle.

STEP 8: Knit the first two stitches on your DP needle using the other DP needle
as your right hand needle.

STEP 9: Insert DP needle through BACK loop of last Stitch on DP needle and through the BACK loop of the first stitch on Pocket needle - Knit these two stitches together.
Slide pocket stitch carefully off its needle then the other stitch off its needle. You should have 3 stitches on your right DP needle. You have created one bound off I- cord pocket stitch.

STEP 10: You have 3 stitches on the DP needle now and one less on the pocket needle. See photo below.

STEP 11: Now pull working yarn behind the stitches as shown below......and then.....

STEP 12: Slide Stitches from one end of the DP needle (top photo) to the other end of the needle, as shown in the bottom photo. Begin knitting next round.


STEP 13: Repeat step 8-12 until all pocket stitches are bound off.

STEP 14: To bind off last stitches, when the last stitch from pocket needle is bound off. Pull working yarn behind these stitches. Slide these stitches to the opposite end of the DP needle, now bind off each stitch. Secure the end thread but, sewing it through the stitches and then pull it through I-cord cylinder to hide the end. You are finished. See photo below of finished pocket with completed I-Cord edging.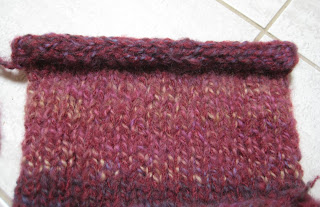

I hope this tutorial helps you with your next I-Cord bind off.
It was a total techno nightmare preparing this. Gottal run I am 30 minutes late to my stitch n'bitch meeting....
wishing you a great evening,
smiles to you,
DC


5 comments:
It was certainly interesting for me to read the post. Thank you for it. I like such topics and everything that is connected to them. I would like to read more soon.
I want not approve on it. I regard as nice post. Particularly the title-deed attracted me to review the sound story.
Well I acquiesce in but I about the collection should acquire more info then it has.
Don't stop posting such themes. I like to read blogs like that. Just add some pics :)
Nice article you got here. I'd like to read something more concerning this matter. Thnx for sharing that material.
Post a Comment