Tuesday, October 14, 2008

Part 2 - Vogue Holiday 2008 - #17 Lace Wrap Cardigan


Okay, I'll admit it.......I have some humble pie to eat....from yesterday's post. The good news is I was not entirely wrong. I got a response from vogue knitting today. Here it is from Lisa Buccellao @ Vogue Knitting:
"There is an error in the RS/WS instructions, beginning with Chart B on the Back. The corrections are copied below:

Vogue Knitting
Holiday '08
#17 Lace Wrap Cardigan
photo on pg 79, instrux beg on pg 113

BACK
Beg chart A

…K 3 rows, ending with a WS row.

Beg chart B
Row 1 (RS) P1, work 5-st rep 12 (14, 16, 18, 20) times……..

Armhole Shaping
…K 3 rows, ending with a WS row.

Beg chart C

Delete P 1 row, beg with Row 1 of Chart C.

RIGHT SLEEVE

Beg chart B
Row 1 (RS) P1 (1, 1, 0), work 5-st rep 6 (6, 7, 7, 8) times, end p1 (1, 0, 0, 0)……

The symbol in Chart C is not a double decrease but a single decrease, as the sl st

goes over the 2 knit sts, and these 2 sts are not a k2tog. ----Lisa B"

OOOPS.....and big double OOOPSSSSSSSSS...

I stand corrected. While that symbol looks like a k3 together symbol........IT IS NOT! When I went back to look at it and carefully read it, IT DID SAY, Knit 2.....NOT KNIT TWO TOGETHER.

Turns out I was right about the WS/ RS problem ......even though I finally decided that was my error not Vogue's.... and was wrong about the Chart C error. LOL!!!

I am blaming it all on the banking crisis....and the fact my 2007 tax return is due tomorrow and I have not started to fill out the form! I ran out of extension time! LOL!!! I do this every year...my inner child does not like to do taxes....and there is just no reasoning with her.

I also wrote to Lisa, about the following other questionable issues with this pattern:

1. The right front says use patterns D, B and E. The photo shows Patterns D, A and E were used.

2. The armhole decreases for the fronts....and the back are different. Is this intentional or an error?

For the small size, I did 7 additional decreases to end up with the 12 stitches. 8 times would give me 11 stitches.

3. I also questioned the decreases at the neck edge, which I am concerned are too steep. In the extra small they suggest the last 8 decreases should be done every 4th row instead of every row.

I will await Lisa's response before, I post the solution here.

I did finish the back and the two fronts and decided to block the pieces. I am concerned that the decreases on the front neck edges are so steep they will not even cover my boobs and I would hardly say I am overly endowed!

I am fairly certain both back and front will need to be frogged and started over. Do you believe with all this, I had the guts to start a sleeve, without lisa's further response?I am definitely frogging my Chart C, it is too lacey against the other stitches used.

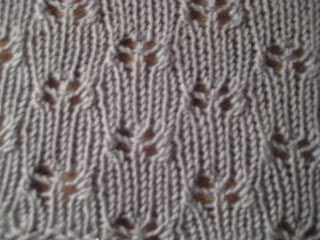
And another piece of good news out of all this mess.......is that I do like the lace pattern created with my corrected Chart C as described in the October 13th post.......I think I will use it to design a scarf or sweater. It really looks great blocked. very interesting. I wonder if I created a new stitch pattern....is that possible? Or does this have a name?


Here are my further modifications for the sleeves. I just do not like them as they are shown in the photo....so I am using these patterns. For the right sleeve, I am using Chart A first, then C, which I do not have a photo...because I did not read the chart properly, and panicked prematurely. Did I mention that I hate knitting charts? LOL!


and then possibly Chart B.


For the left sleeve, either Chart D or C, then E, A. It differs slightly from their photo. I just think pattern stitch E is too solid next to pattern stitch D. I do not like the look.


Sorry, about the not too good photos, but the best I can do in my blocking room which, does not have good lighting. Also please excuse my foot....I should have at least been wearing a nice pair of handknit socks......LOL!!!

I am determined to finish this sweater, for some reason unbeknowst to me....even though it is a prime candidate for the UFO heap! Wish me luck. Only the left front is dry, the other two parts are still damp. I am sure the armholes are way to deep on the fronts and are going to require frogging. And I am definitely going to frog My Chart C and Do Chart C correctly, now that Lisa, was kind enough to point out my inability to read knitting charts correctly.

Oh and that is another point. These charts are read all rows, left to right. Not left to right, right to left as knitting for dummies suggests. Honestly, there needs to be some standardization of symbols used and method for reading these knitting charts if they are to be useful.

I am going to rename this pattern on ravelry Lace Wrap Cardigan from Hell!

Wishing you a great evening....
Smiles to You,
DC

Monday, October 13, 2008

Vogue Knitting Holiday 2008- #17 Lace Wrap Cardigan


I could not resist, casting on for the Lace Wrap Cardigan from the new Vogue Knitting Magazine, Holiday 2008, #17 Lace Wrap Cardigan by Teva Durham.

The photo is of the back in progress. It is now finished. Not without problems.

First I made a mistake, which is NOW A MODIFICATION, because I like it better. I have only one garter rib between pattern changes instead of the two ribs.

Between Chart A and B: the pattern says end at row 11 of Chart A, then K 3 rows. I ended with row 12 and knit 2 rows, then started with row 2 of Chart B as instructed.

Because of the error above, when I got to the transition between Chart B and C, I also knit 2 rows instead of the three required. I like the one garter rib instead of the two shown in the pattern.

The Chart C in the magazine appears to be wrong, there is an error. If you follow it you will get a triangle instead of the correct back shaping. It also does not look like the photo which, is a cable pattern instead of a lace pattern.

Here is my fix, that I used to keep from decreasing the stitches....and it gives you a nice lace pattern:

It should be row 2: YO, k, YO, k3
and Row 4 should be: K3, YO, k, YO.

I still have not heard back from vogue as to what the correct chart should read. I am the first doing this pattern on ravelry so there is no other place to find this errata at the present time. I did post to ravelry in the editors notes.

Or it is possible that the Chart symbols are not correct. If you want the cable pattern, then you could do this:

Row 1: 3 stitch cable ( put one stitch on cable needle hold to front, knit 2, then knit the stitch off cable holder repeat around
Rows 2-4 knit the knits and purl the purls.
Repeat for pattern.

I have not tried this, but my guess is this was the designers intention looking at the photo. LOL!

I finished the back and started the left front and used my chart C. Sorry no photo yet. I see that the pattern ALSO, differs from the photo for both the left front and the right front. Does anyone edit these patterns? Of course, the back is not shown, or I might have used my second choice for correcting Chart C. LOL!

This is the first Teva Durham pattern I am knitting and so far, way too many errors for my liking. Not sure if this is the norm with her patterns, is it????? When I use a pattern, I do not want to think so hard....otherwise, I would design my own sweater.

Anyway, I knit the left front like the pattern, which instructs you to use the same patterns as you used on the back, which includes my first corrected Chart C. However the photo shows the last pattern on the left front is from a Chart that is NOT INCLUDED IN THE MAGAZINE!!!! LOL! It is also used on both sleeves. Have not decided on how to handle this.

Their Chart C, does not include anything replicating a Cable pattern, it has a K3 together decrease on Rows 1 and 3....NOT EVEN CLOSE VOGUE MAGAZINE! ....not even close to the photo.

You might remember that this is the same issue from the other lace cardigan I started in 2004 which rendered it to my UFO pile....and I am just resurrecting. sleeves are almost done. Painful to follow the chart with the cap decreases. ......both cardigans instructions and photos differ!!!

Finished the left side yesterday and cast on the right front. Here I am having problems and have frogged twice already because no row counts are given for the sections.

So here goes, to match the left front, I used 36 rows or 9 pattern repeats of Chart D. It worked. If you measure like I did, plan on frogging....your stitch count after the armhole decrease will not be correct.

Then the pattern tells you the next section should be Chart B...but the photograph uses Chart A.

I am using Chart A. So after the 2nd frog to rip out the bottom...I am close to the armhole bind off. Yippee! Hopefully my stitch count will now work. What a mess.

The worst part, is this is a fast knit. I started friday afternoon about 3pm and went out that evening. I would be done the right front if the directions were better and possibly done one sleeve.

I am using cynthia helene superwash merino, which is very nice yarn. I am happy with it as a replacement yarn. gauge is good.

Lesson learned, let someone else knit the patterns first and find their corrections on ravelry. I have no idea what a mess that debbie bliss cable jacket, silver belle would have been without the help I got from ravelry.

Want to finish this, so I am going back to knitting....and figuring out the pattern as I go along. Just hope it fits after all this. I think this pattern runs small, so consider that also if you decide to knit it.

Wishing you a great fall day,
Smiles to you,
DC

Tuesday, October 7, 2008

Yarn gauge, Wraps per Inch, Yarn substitution, etc...

always make for a hot topic. Especially when you enjoy spinning your own yarns, which I do enjoy when time allows me. So do you spin your yarn for the pattern or adapt a pattern to the yarn you spun? Decisions, decisions....

If you have spun yarn without a project in mind, then the best way to find a project is to determine the wraps per inch. You do this by carefully wrapping the yarn around a ruler making sure the yarn does not overlap and counting the number of wraps that make up an inch.

It is important not to wrap the yarn to tightly or too losely. You can also buy a "Wraps per inch tool" or Yarn Gauge Tool , almost any spinning wheel manufacturer sells them. Mine is from schacht or it was, since I have no idea where is disappeared to...or my spinning hook.....

I found this guide to yarn classifications while reading knitting daily today (if you are not already a subscriber this is a great free newsletter - join up! ), which they credit from their great magazine spin off........you can order a subscription to this magazine if you have interest from the knitting daily site. Liz Gipson wrote a great article about this subject in todays edition to knitting daily. She also mentioned that is a gauge....and is not standard, which I have found to be true. You can find info like this all over the net and in the back of your knitting or crochet magazines....or books....and in a spinning book that you own or buy.


Yarn Style / Wraps per Inch / Gauge stitches/inch / Needle size US / Needle size Metric

Lace / 10plus / 8+ / 00–2 / 2–3 mm

Fingering / 16 / 6–8 / 2–4 / 2.75–3.5mm


Sport / 14 / 5–6 1/2 / 4–6 / 3.5-4.5mm


Worsted / 12 / 4–5 / 7–9 / 4.5–6mm


Bulky / 10 / 3–4 / 10–11 / 6–7.5mm

Very Bulky / 8 or fewer / 2–3 / 13–15 / 8–9mm


So after you use the table above, to select your needles....knit a gauge swatch and choose the needle that gives you the drape of knitted fabric that feels best for the project you have in mind.

You can also use the table to figure out what type of project your yarn would be best suited.

Lately when I am spinning a plain yarn, I tend to make fine singles. I make up the skeins....and if I want a thicker yarn later I can always go back and ply the singles together.

Spinning your own yarn seems to be really becoming more popular, which I think is great. It is one of the most relaxing activities to participate in....and if you have never tried it, think about buying one of the many spindles out there to try your hand at this art. It is not a big investment and even if you do not want to do it ever again.....it will change the way you look at yarn, when you know how it is made.

Shameless Advertising Deal of this Post.....

For all you dog/ cat owners that use front line....for ticks and fleas...and want a great deal. I found this website where you can order it at a deep discount and they ship for free! You may want to check it out. For my two small pups, I am saving 9.99 per three packs....which is a great deal. If you buy a 12pk you save $36 over the retail price....and FREE SHIPPING!


I use front line....and it works. I wish it was cheaper, so I am always looking for deals on the net.
This is a good one.

Back to ebaying....which, is my life these days. I am obsessed with getting rid of all this stuff....it has been a long time coming.....and has to get done! Please check out my auctions and store by clicking here.

It is getting so cold.....I am freezing sitting at my desk....today. Time to get out the sweaters....
Wishing you a great day,
Smiles to you,
DC

Sunday, October 5, 2008

Wisdom and creativity..........

The general population's belief on how to gain wisdom...and mine may differ.

Here are my thoughts on signs of wisdom:

- knowing you don't know.......and finding your balance anyway... Is an absolute sign of wisdom!

- realizing you are standing in front of a billboard...and are not reading the sign.

- life is like water.........it flows, when it meets resistance...it dances, spins and swirls...those are the whirlpools and eddys of our lives....a time to seize for reflection, time to comtemplate, instead of feeling trapped and rebellious,...a time to change patterns, move to a different rhythm.......until we move on....for we have no choice eventually, except to move with the current.

It is in those eddys and whirlpools that our creativity originates..........and wisdom can be found. Though those struggles may seem mighty....they are the silver linings....that make our clouds cool!

Rushing past them quickly, is a mistake!!!!! Though that opportunity may seem as a gift.

Wednesday, September 24, 2008

Tutorial for I-Cord Bind-OFF with PHOTOS...

This is my version of the easy way to do an I-Cord Bind OFF edging as illustrated from the felted bag I just completed see this post. You will need a gauge swatch to work this tutorial and 2 additional DP(Double Point) needles in the same size as your working needles for your gauge swatch. In the pocket below, my live stitches are on a circular needle.

I am using a very bulky yarn and large needles size 13, which makes this tutorial really easy to follow, but YOU can use any size needles and yarn that you prefer.

TUTORIAL- I- CORD BINDOFF


STEP 1: With your regular needles prepare a swatch. You can use any size needles and yarn that you wish. Make sure you have two DP needles to match your pocket or swatch needle.

I would cast on 15 to 20 stitches and then work an equal number of rows. You are now ready to begin this tutorial


STEP 2: Cast on three additional stitches for the I-Cord Bind off. Note: you may cast on any amount of stitches you desire, the more stitches the larger/ thicker the I-Cord will be.

Insert right needle, through last two stitches on left needle.........wrap yarn around right needle and....


STEP 3: Pull up stitch (loop) with right needle as shown in the photo below.


STEP 4: Twist the stitch (loop) you just pulled through and transfer it from your right needle to the left needle. One cast on stitch made.


STEP 5: Insert your right needle Front to Back between stitch just made and last stitch on left needle. Pull the loop up through the original two stitches.

Twist right needle clockwise and place new stitch on left needle. It will look like the photograph in step 6 below, after you have cast on the 3 required stitches. Note: your I-cord can be as big as you choose, add as many stitches as you require.


STEP 6: Repeat this procedure until there are three new stitches on the left needle...as shown in the photo to the below.


STEP 7: Pick up and put these last three stitches and put them on your DP needle.


STEP 8: Knit the first two stitches on your DP needle using the other DP needle
as your right hand needle.


STEP 9: Insert DP needle through BACK loop of last Stitch on DP needle and through the BACK loop of the first stitch on Pocket needle - Knit these two stitches together.

Slide pocket stitch carefully off its needle then the other stitch off its needle. You should have 3 stitches on your right DP needle. You have created one bound off I- cord pocket stitch.


STEP 10: You have 3 stitches on the DP needle now and one less on the pocket needle. See photo below.


STEP 11: Now pull working yarn behind the stitches as shown below......and then.....


STEP 12: Slide Stitches from one end of the DP needle (top photo) to the other end of the needle, as shown in the bottom photo. Begin knitting next round.


STEP 13: Repeat step 8-12 until all pocket stitches are bound off.


STEP 14: To bind off last stitches, when the last stitch from pocket needle is bound off. Pull working yarn behind these stitches. Slide these stitches to the opposite end of the DP needle, now bind off each stitch. Secure the end thread but, sewing it through the stitches and then pull it through I-cord cylinder to hide the end. You are finished. See photo below of finished pocket with completed I-Cord edging.


I hope this tutorial helps you with your next I-Cord bind off.

It was a total techno nightmare preparing this. Gottal run I am 30 minutes late to my stitch n'bitch meeting....

wishing you a great evening,

smiles to you,

DC

Tuesday, September 16, 2008

They're backkkkkkkk!!!! Fallen LEAVES!

With a vengeance. Where have I been?....ONE WITH MY LEAF VACUUM!!!

How do I love that lawn and garden tool....It is my best pal! I pray for him every day....that he does not die on me, before the end of November....I love him....I even decided to name him. VIRGIL...the leaf vacuum...I would kiss him but, absolutely positively...YUCKKKKKK!

He is one of the best men that I have known.

Without him, I would never have time to knit in the fall....all I would be doing is raking and raking and more raking. The best part is he makes mulch to put around my trees. Leave mulch, is one of the best mulches to use in your garden.

Every morning,I have to remove leaves from the pool, leaves from the pool deck and leaves from the wooden deck. UGGGGGGHHHHH! All I have to say, is if you do not have one get one! Now!


Okay, and then there is my new best find.

...life without UFO boyfriend, DOES HAVE its benefits and may I emphasize.....PLENTY of benefits....but, I have to admit, he was great at trimming high bushes which, I just can't reach. Well today, while I was searching for solutions....since, I am deathly afraid of ladders and heights.I found this....YIPPEE!!!

Guess who ordered one, pronto!today...? MOI!!! how great is this...? You may want one too...what a great invention...and it is cordless. I guess, I just have to admit I am a girl that LOVESSSSSSSS, power tools! No more shredding the power cord with my hedge trimmer...which is a yearly occurence! Just burnt up another one last week.


Now that we got the lawn work out of the way let's talk about knitting. Finished the felted tote bag, finally. It is off the needles and just have to felt it. Made progress on the clapotis scarf, but not real happy with the yarn selection. Oh well, some poor soul will get it for a holiday gift. My sleeves for the cable and lace cardigan are still going, albeit slow. Hopefully, I will have time to focus this weekend, am binding off for the sleeve caps, finally. Then just have to sew it up.

and surprise, surprise, while finishing up the tote bag, I suddenly realized that I was knitting with big yarn and big needles and could take photos while I did it. So I did...and coming soon will be a pictutorial of an I-Cord bind-off. I hope to post that later this week.

Between the leaves and the ebay store decluttering project....I am strapped for time these days! Please check out my ebay store...besides the cool antiques, I am putting up some yarn kits, a swift, a needlepoint kit, caligraphy kit unused and there will be knitting books as well.......so keep checking...my store or sign up for my newsletter there.

gotta run and do ebay postings....

wishing you a great day,
smiles to you,
DC

Tuesday, September 2, 2008

I oughta have something relevant to say......BUT, ....

sometimes in life it is best to shut your yapper! Silence is golden....blah, blah, blah!

Here are my thoughts of late, the less said the better. Summer is almost gone...and did I find the man of my dreams????....NOOOOOOOOOOOOOO! Did I finish up my UFO's? NOOOOOOOOO!

So where did summer go? who knows, but it might be the last at my home. The last time I spend at my pool. So I am enjoying it like it will be my last time.

UFO has done himself in...FINALLY! I don't think he will ever be able to resurrect himself from this one.........all I will said in this regard is...what webs we create, when we first choose to deceive....will eventually bite us in the BUTT!

I am at work on two UFO's....a felted knitting tote and the cables and lace cardigan. I must admit the cables and lace cardigan got to me again, the pattern is intense...I am 3/4 of the way done the sleeves and just finishing to be done.

The good news, is I have not cast on any new projects...the Bad news, is not much knitting news to report.

I got bored and started to work on the felted tote bag. I finished the tote bag today and just started on the first of two I-Cords for the straps. This one should be done this week. It is a two-for...because, I am unloading a yarn that I bought in the late 80's in the midwest, which color was not becoming to me as a sweater...and I will be finishing one of my UFO's. Will post photos before I felt this baby.

Meanwhile, I am focused on unloading STUFF, on ebay...please visit my store. I will have many craft items up for sale....eventually and equally interesting paraphenalia, vintage stuff and antiques. I am doing this one box at a time. It is tedious...but, it feels good to get this STUFF to homes that will love it!!!!

wishing you a wonderful day,
SMILES TO YOU,
DC